The 5 Tastes Table

#foodblogchef

  • Home
  • About
  • Spices
  • Recipes Index
  • Contact Us

Coconut Mango Macadamia Scones →

May 02, 2023 by FoodBlogChef in Breads

My ancestors in the British Isles would consider this recipe to be blasphemy. I apologize, but someone had to do it. These tropical scones are a treat with your morning coffee or afternoon snack and you don’t need jam. It’s all in there. Enjoy!

Coconut Mango Macadamia Scones
Yield about 8 scones
Ingredients:

  • ¼ cup Coco Lopez

  • 2 teaspoons baking powder

  • ½ teaspoon baking soda

  • ½ teaspoon kosher salt

  • 3 cups all-purpose flour, plus more for surface

  • ½ cup (1 stick) chilled, very cold, unsalted butter, cut into pieces (See *Note below)

  • 1 large egg, beaten to blend

  • ¾ cup heavy cream (Note: if you choose to brush the scones with cream before baking, increase the cream to 1 cup, reserving ¼ cup for brushing.)
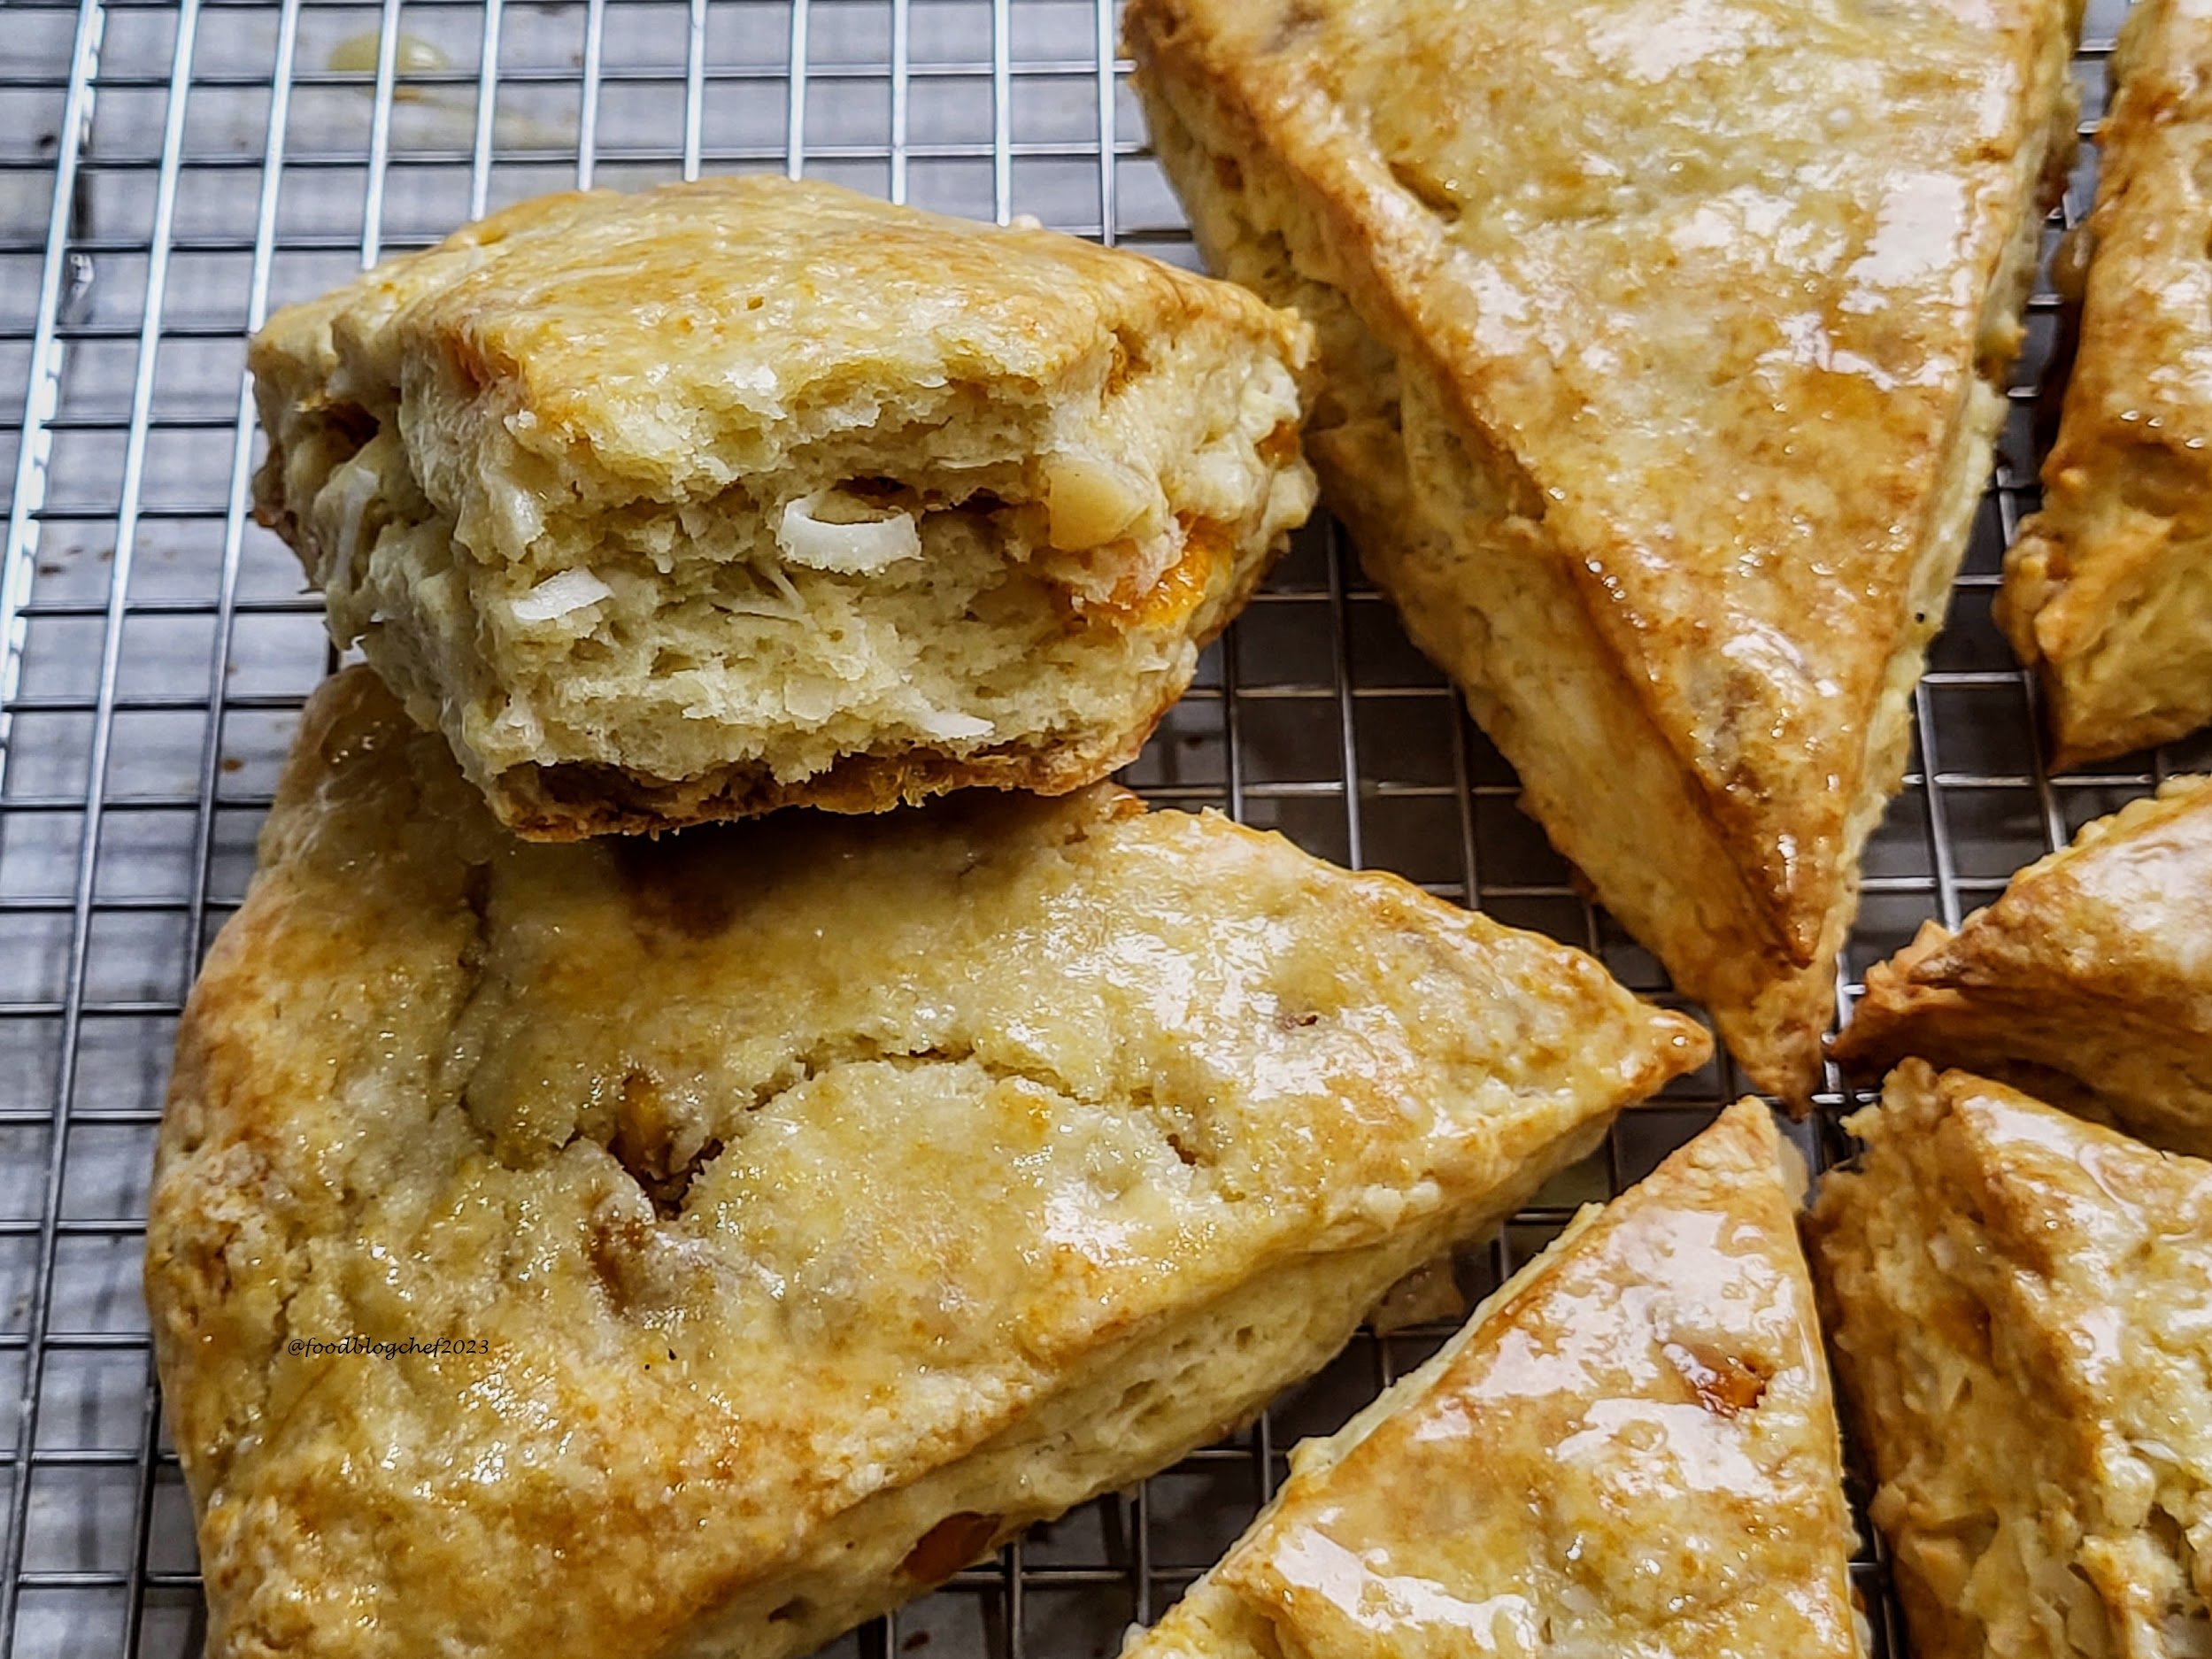
  • ½ cup diced mango

  • ½ cup chopped macadamia nuts

  • ¼ cup flaked coconut

  • 1 tablespoon orange zest

  • 2 tablespoons orange juice for glaze (freshly squeezed preferably)

  • Demerara or raw sugar (for sprinkling; optional) 

Preparation:
Preheat oven to 375° F.

1. Whisk baking powder, baking soda, salt, and 3 cups flour in a large bowl to combine.
2. Add butter and toss to coat. Using your fingers or a pastry blender or a food processor on pulse to work the butter into the flour until you have a very coarse mixture with pea-size pieces of butter. If using a food processor, scrape the flour mixture into a large bowl.
3. Make a well in the center; add egg, cream, Coco Lopez, mango, nuts, coconut, and zest and mix with a fork, incorporating dry ingredients a little at a time, until a shaggy dough forms (it’s okay if it looks a little dry; don’t overwork).
4. Lightly knead the dough in the bowl until it just comes together.
5. Turn out onto a lightly floured surface and pat into a 1"-thick round. Cut into 8 wedges and transfer to a parchment-lined baking sheet.
6. Brush dough lightly with reserved cream and sprinkle with demerara sugar. (optional, if you don’t use the glaze recipe below)
 7. Bake scones until golden brown, 25–30 minutes.

 Remove scones from the oven and allow them to cool for 10-15 minutes before drizzling with the glaze. (optional) 

For the Orange Glaze:
1/2 cup confectioners' sugar
2 tablespoons orange juice
1 teaspoon lemon zest (optional)
1 teaspoon butter
You can make the orange glaze in a double boiler, or for a simpler alternative, you can zap it in the microwave.

For the double-boiler method:
Mix the orange juice with the confectioners sugar in a heatproof bowl over a pot of simmering water until dissolved. Whisk in the butter and lemon zest until the glaze is smooth.

For the microwave:
In a microwave-safe bowl, melt the butter. Whisk in the juice, confectioners sugar, and lemon zest. Whisk the glaze to smooth out any lumps; if necessary microwave for an additional 30 seconds and whisk again to smooth out the glaze;  then drizzle the glaze over the top of the scones. Let it set a few minutes before serving. 

*Note: using a box grater to grate the cold butter provides a more even distribution of butter in your dough.

 Adapted from: https://www.bonappetit.com/recipe/bas-best-cream-scones

print recipe
May 02, 2023 /FoodBlogChef
mango, coconut, macadamia nuts, flour, baking powder, baking soda, Coco Lopez, heavy cream, orange juice, butter, egg, orange zest, confectioners sugar, salt
Breads
Comment
Photo: c. foodblogchef 2021

Photo: c. foodblogchef 2021

Pate Brisée Pie Crust →

February 16, 2021 by FoodBlogChef in Breads

Buttery, light, and flaky, this is my favorite pie crust for fruit pies or savory meat pies. For novices to making pie crust, it might take a couple of tries before you perfect your method, but the result is more than worth it! I highly recommend this video tutorial as a place to begin your journey to perfecting your own pie crust: https://www.joyofbaking.com/PieCrust.html

Pate Brisée Pie Crust
2- 9 inch crusts

Ingredients:

  • 2 ½ cups (320 grams) unbleached all-purpose flour

  • 1 tablespoon granulated sugar

  • 1 teaspoon fine sea salt (if using salted butter reduce salt to ½ tsp.)

  • less than ½ cup (120 milliliters) ice water + 2 teaspoons apple cider vinegar

  • 1 cup (225 grams) very cold unsalted butter (2 sticks); cut into ½ inch cubes and freeze for a few minutes

Preparation:

  1. In a medium bowl or food processor, whisk together the flour, sugar, and salt; set aside.

  2. In a measuring cup or a small bowl, combine the cold water and vinegar; set aside.

  3. If using a food processor, evenly distribute the cubes of chilled butter over the flour and pulse 15-20 times to incorporate the butter with the flour. If not using a food processor, gently toss the chilled butter in the flour mixture until coated, then use a pastry blender to cut the butter into the flour. (You should have pieces of butter that range from sandy patches to pea-size chunks, with some larger bits as well.)

  4. Drizzle in about a quarter cup of the ice water mixture and stir lightly with a fork, or pulse in the food processor until the flour is evenly moistened and the dough starts to come together. If the dough seems dry, add a little more ice water, 1 to 2 tablespoons at a time. The dough will still look a bit shaggy at this point. If you grab a small piece of dough and press it slightly with your hand, it should mostly hold together. (Note: the Joy of Baking video is very helpful here.)

  5. Dump the dough out onto an unfloured work surface and gather it together into a tight mound. Using the heel of your hand, smear the dough a little at a time, pushing it away from you and working your way down the mass of dough to create flat layers of flour and butter. Gather the dough back together with a bench scraper, layering the clumps of dough on top of one another.

  6. Repeat the process once or twice more; the dough should still have some big pieces of butter visible. Do not overwork the dough or it will be tough.

  7. Cut the dough in half. Shape each piece into a disk and flatten each to about a 5 inch round. Wrap the disks in plastic and put them in the refrigerator for at least 1 hour, or overnight, to rest.

  8. Remove the dough from the fridge about 20 minutes before rolling out.

  9. Using a rolling pin, roll out the dough to a scant 1/8 inch thickness, rotating the disk as you roll the dough to achieve a uniform thickness throughout.

  10. The dough can be stored for 3 days in the refrigerator or up to 1 month in the freezer. If making the dough in advance to freeze: Roll out the dough on a piece of parchment paper, then carefully roll it up in the parchment. Write the date on the parchment and pop it into the freezer to firm up, about 30 minutes. Then wrap the crust securely in plastic wrap. Defrost the dough in the refrigerator overnight or thaw it on the kitchen counter for about 30 minutes before using.

*Note: If you are a novice pie crust maker, I highly recommend viewing the two videos below before you make your pie crust.

https://www.joyofbaking.com/PieCrust.html
https://www.bonappetit.com/test-kitchen/how-to/article/never-mess-up-pie-crust

Also for method see: https://www.thekitchn.com/how-to-make-perfectly-flaky-pie-crust-cooking-lessons-from-the-kitchn-191896
https://www.seriouseats.com/2015/03/science-of-pie-7-myths-that-need-to-go-away.html

print recipe
February 16, 2021 /FoodBlogChef
flour, butter, salt, water
Breads
Comment
Photo: c. foodblogchef 2020

Photo: c. foodblogchef 2020

Blueberry Scones with Lemon Glaze →

August 07, 2020 by FoodBlogChef in Breads

Every year Nancye picks local blueberries and freezes them so we have an ample supply for pies, pancakes, muffins, scones, sauces, or whatever else we decide to use blueberries in. Frozen they are not as good as fresh picked on your cereal, or salads, or just for snacking, but they work perfectly for cooking and retain their fresh flavor through the winter. Spread fresh blueberries in a single layer on a sheet pan and freeze in your freezer. Once frozen, transfer the berries to plastic bags and store in the freezer. This recipe uses frozen berries. If you use fresh picked berries preheat the oven to 400 F. and bake for 25 minutes or until golden brown.

Yield about 8 scones
Ingredients:

  • ¼ cup granulated sugar

  • 2 teaspoons baking powder

  • ½ teaspoon baking soda

  • ½ teaspoon kosher salt

  • 3 cups all-purpose flour, plus more for surface

  • ½ cup (1 stick) chilled unsalted butter, cut into pieces

  • 1 large egg, beaten to blend

  • 1 cup heavy cream (plus ¼ cup if you choose to brush the scones before the oven)

  • 1 cup blueberries

  • 1 tablespoon lemon zest

Preparation:

Preheat oven to 375°.

  1. Whisk granulated sugar, baking powder, baking soda, salt, and 3 cups flour in a large bowl to combine.

  2. Add butter and toss to coat. Using your fingers or a pastry blender or a food processor on pulse to work the butter into the flour until you have a very coarse mixture with pea-size pieces of butter. If using a food processor, scrape the flour mixture into a large bowl.

  3. Make a well in the center; add egg, cream, and mix lightly.

  4. Add the blueberries, and zest and gently mix to incorporate the blueberries into the dough. (it’s okay if it looks a little dry; don’t overwork).

  5. Lightly knead the dough in the bowl into a round ball.

  6. Turn the dough out onto a lightly floured surface and gently pat into a 1-1 1/2”-thick round. Cut into 8 wedges and transfer to a parchment-lined baking sheet.

  7. Brush dough lightly with reserved cream and sprinkle with demerara sugar. (optional, if you don’t use the glaze recipe below)

  8. Bake scones until golden brown, about 30 minutes.

  9. Remove scones from the oven and allow them to cool for 10-15 minutes before drizzling with the glaze. (optional) The scones are moist enough with the glaze that you don’t need butter or jam, but if that’s your preference, go for it!

Lemon Glaze:

  1. 3 tablespoons of freshly squeezed lemon juice

  2. 1 cups confectioners' sugar, sifted

  3. 1 tablespoon unsalted butter

  4. 1 lemon, zest finely grated

You can make the lemon glaze in a double boiler, or for a simpler alternative, you can zap it in the microwave.

For the double-boiler method:
Mix the lemon juice with the confectioners sugar in a heatproof bowl over a pot of simmering water until dissolved. Whisk in the butter and lemon zest until the glaze is smooth.

For the micro-wave:In a micro-wave safe bowl, melt the butter. Whisk in the juice, confectioners sugar and lemon zest. Whisk the glaze to smooth out any lumps; if necessary micro-wave for an additional 30 seconds and whisk again to smooth out the glaze; then drizzle the glaze over the top of the scones. Let it set a few minutes before serving.

Adapted from: https://www.bonappetit.com/recipe/bas-best-cream-scones

Print Recipe
August 07, 2020 /FoodBlogChef
blueberries, lemon zest, lemon juice, flour, eggs, heavy cream, butter, baking soda, baking powder, salt
Breads
Comment
Photo c. foodblogchef 2020

Photo c. foodblogchef 2020

Old Fashion Buttermilk Waffles →

April 20, 2020 by FoodBlogChef in Breads

This old fashion country waffle recipe comes from the Allen family of Dinwiddie County, Virginia and was passed to my wife’s mother, Jean Fitzpatrick Andrews by her sister-in-law Nancye Allen Fitzpatrick. The original recipe is not a Belgium waffle, but rather thinner, light, fluffy, and chewy. If all you have is a modern Belgium waffle maker, don’t worry, you will still end up with great waffles. Top with butter and maple syrup or honey, or the syrup of your choice with a side of “no guilt” bacon. Be warned, they are so deliciously light and fluffy you’ll be amazed at how many you can eat.

Makes about 24 5 inch square waffles.
Preheat the waffle iron.
Ingredients:

Sift together:

  • 2 ½ cups flour

  • 1 teaspoon salt

  • 2 ½ teaspoons baking powder

In a separate bowl mix together:

  • 4 eggs

  • 2 cups buttermilk

  • 4-6 tablespoons canola oil

Preparation:

  1. Slowly stir the flour mixture into the liquids.

  2. Spoon the batter onto your waffle iron and cover until golden brown.

  3. Serve immediately with butter and your choice of syrup.

Extra waffles can be cooled and frozen for several weeks. Reheat in the toaster oven.

Print Recipe
back to breads
April 20, 2020 /FoodBlogChef
flour, salt, baking powder, eggs, canola oil, buttermilk
Breads
Comment

Blueberry Muffins →

November 15, 2019 by FoodBlogChef in Breads

YIELD: 6-12 muffins

Ingredients:

  • 2 1⁄2 cups flour

  • 1 ½ tsp. baking powder

  • ½ teaspoon baking soda

  • 1⁄4 teaspoon salt

  • 1/8 teaspoon nutmeg

  • 2 eggs, beaten

  • 3⁄4 cup sugar

  • 1 cup buttermilk

  • 4 ounces (browned) butter or 1⁄2 cup canola-butter

  • 1 ½ cups blueberries

  • 1 teaspoon vanilla (optional)

  • 1 teaspoon grated lemon zest (optional)

  • cinnamon sugar (optional)

Photo: c. foodblogchef 2019 - Blueberry Muffins

What could be better than the smell of fresh baked bread or muffins? I love blueberry muffins with coffee for my morning jump start. For this recipe, I add cinnamon and nutmeg, and lemon zest, flavors that compliment the blueberries. I also lightly brown the butter to add extra richness and flavor to the muffins.

Preparation:

  1. Sift the first five dry ingredients together in a large bowl.

  2. In another bowl, whisk eggs and sugar until creamy, whisk in the buttermilk and butter that has been melted until just beginning to turn brown.

  3. Add blueberries and lemon zest to dry ingredients and mix gently to coat berries with flour

  4. Make a well in dry ingredients and pour in liquid ingredients, mixing quickly. Don’t over-mix, or the muffins will be tough.

  5. Spoon batter into a greased muffin pan or line the muffin pan cups with paper muffin cups, sprinkle with cinnamon sugar, and bake till golden brown.

  6. Bake at 400 F for 20-30 minutes until a toothpick inserted into the muffin comes out clean with no batter sticking to the pick.

    *Note: If you use frozen blueberries, the cooking time will be longer than 20 minutes.

print recipe
November 15, 2019 /FoodBlogChef
blueberries, eggs, lemon zest, flour, buttermilk, nutmeg
Breads
Photo: c. foodblogchef 2019 -                   Savory Buttermilk Biscuits with Thyme and Black Pepper

Photo: c. foodblogchef 2019 - Savory Buttermilk Biscuits with Thyme and Black Pepper

Savory Buttermilk Biscuits with Thyme and Black Pepper →

November 06, 2019 by FoodBlogChef in Breads

These are great with soups and stews. You can reheat them by placing them in a preheated oven or toaster-oven at 300 degrees for 5 minutes.

Yield: about 10-12 biscuits

Ingredients

  • 2 cups all-purpose flour

  • 2 teaspoons baking powder

  • 1 teaspoon salt

  • 1/4 teaspoon baking soda

  • 1 teaspoon dried thyme (optional)

  • ½ teaspoon ground black pepper (optional)

  • 7 tablespoons unsalted butter, chilled in the freezer and cut into thin slices

  • 3/4 cup cold buttermilk (see *Note below)

  • 2 tablespoons buttermilk for brushing (optional)

Directions

Preheat oven to 425 degrees F (220 degrees C).

  1. Line a baking sheet with a silicone baking mat or parchment paper.

  2. Whisk flour, baking powder, salt, baking soda, thyme, and black pepper together in a large bowl.

  3. Cut butter into flour mixture with a pastry blender until the mixture resembles coarse crumbs, about 5 minutes. You can also use the “pulse” feature of a food processor, but don’t over-process the mixture. You want it to look like coarse crumbs.

  4. Make a well in the center of the butter and flour mixture. Pour in 3/4 cup buttermilk; stir until just combined. Don’t overwork the dough or the biscuits will be tough.

  5. Turn dough onto a floured work surface and pat together into a rectangle.

  6. Fold the rectangle in thirds. Turn the dough a half turn, gather any crumbs, and flatten it back into a rectangle. Repeat twice more, folding and patting dough down a total of three times.

  7. Pat-down dough on a floured surface to about 1/2+ inch thick. (thicker=higher biscuits and longer bake time)

  8. Cut out 12 biscuits using a 2 1/2-inch round biscuit cutter.

  9. Transfer the biscuits to the prepared baking sheet.

  10. *Optional: Press an indent into the top of each biscuit with your thumb.

  11. *Optional: Brush the tops of the biscuits with 2 tablespoons of buttermilk.

  12. Bake in the preheated oven until browned, about 15-20 minutes.

*Note: you can buy buttermilk in the Dairy Section of your market, or you can make your own buttermilk by mixing 4 1/2 tsp. white vinegar with milk to make one cup of buttermilk.

*Note: omit the thyme and black pepper if you want more traditionally flavored biscuits, or brush the biscuits with buttermilk before baking and sprinkle with Everything Sesame seasoning.

print recipe
November 06, 2019 /FoodBlogChef
flour, baking powder, baking soda, thyme, butter
Breads

Instagram Facebook Pinterest

Powered by Squarespace