The 5 Tastes Table

#foodblogchef

  • Home
  • About
  • Spices
  • Recipes Index
  • Contact Us
Photo: c. foodblogchef 2020

Photo: c. foodblogchef 2020

Polenta Cakes →

February 15, 2020 by FoodBlogChef in Starters

What to do with leftover Creamy Parmesan Polenta? Turn it into delicious slightly crunchy-creamy Polenta Cakes. Simply take a handful, or scoop of the leftover polenta and make patties about 1/2-3/4 inch thick and pan-fry them on a hot griddle. A tribute to the versatility of polenta, you can make breakfast polenta cakes with an egg on top; cut the cakes into quarters and serve them as appetizers with toothpicks with a simple marinara for dipping, or create a first-course with the topping of your choice. As a main course with a green salad, these polenta cakes are delicious with shredded Beef Ragu as pictured. If you want to use the polenta cakes as a first course, you might want to make them thinner than ½ inch like the photo. Served as a starter, thin polenta cakes are perfect vehicles for creamy and savory toppings or serve them for a light lunch with a green salad. For a savory variation of the basic polenta, you could add a bay leaf or 1/4-1/2 teaspoon of thyme while cooking. For a saltier polenta, substitute Pecorino Romano, aged Gouda, or Gorgonzola for the Parmesan. Experiment and find the combination that you enjoy. Let your imagination be your guide.

1. Make the Polenta.

2. If you’re not using leftover
polenta, line a baking dish with plastic wrap, or grease the sides of the dish with butter or olive oil.

3.
Pour the freshly made hot polenta into a baking dish or sheet pan that will allow you to spread out the hot polenta to about 1/2-3/4 inch thickness. Spread the top evenly, allow to cool, cover with plastic wrap, and refrigerate until firm.

4. Slice into rectangles or squares, or cut into portions with a cookie/biscuit cutter. Pan-fry in a cast iron or non stick pan with a little olive oil until brown on both sides. (2-3 minutes on a hot skillet)

print recipe
February 15, 2020 /FoodBlogChef
polenta, starters, corn meal, parmesan
Starters
Comment
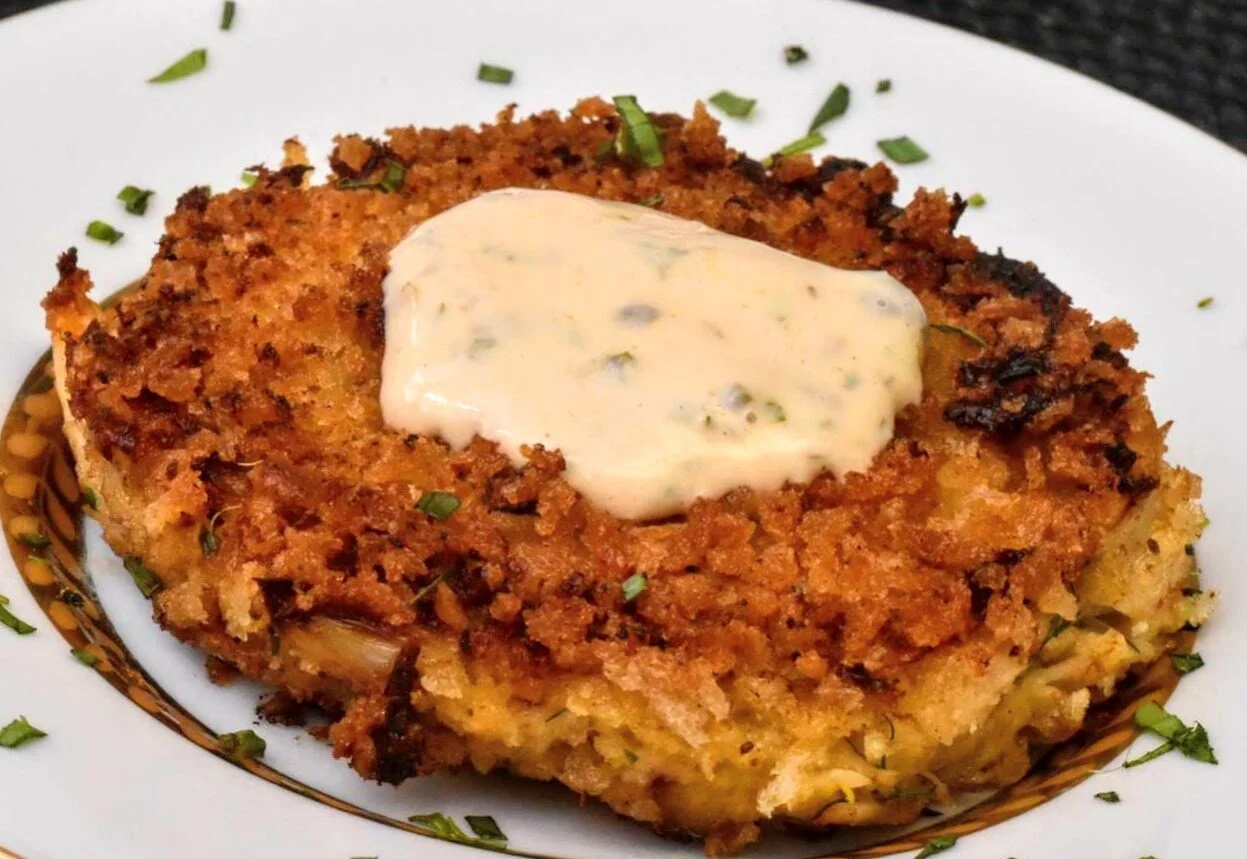
Photo: c. foodblogchef 2019 - Crab Cakes with Remoulade Sauce

Photo: c. foodblogchef 2019 - Crab Cakes with Remoulade Sauce

Crab Cakes pour tout le monde →

December 14, 2019 by FoodBlogChef in Starters

I fell in love with Crab Cakes years ago when I used to spend time in Baltimore, Maryland. Like so many regional delicacies, crab cakes inspire great culinary passion and debate when it comes to determining “What is the best Crab Cake?” Analogous to cooking an authentic French Bouillabaisse, authentic crab cakes must be made with fresh, locally sourced seafood, in this case fresh, mid-Atlantic lump blue crab meat, eggs, and a small amount of a binder like crushed crackers, with minimum added flavors. The holy grail is to showcase the delicate flavor of the crab. For those of us who don’t have easy access to fresh Chesapeake Bay lump, blue crab meat, this presents a problem. Several years ago, I became a bit obsessed with finding an acceptable alternative to Shirley Phillips’ original crab cake recipe. I researched and tried a lot of crab cake recipes and this is what I came up with. If you’re lucky enough to have access to fresh, lump blue crab meat, be sure to try Shirley’s original recipe. On the other hand, if you are someone who likes/loves crab cakes, but who has to rely on pasteurized canned crab meat from your supermarket or local fishmonger, you might like this recipe. It incorporates fresh herbs to amplify the taste of more commonly available canned crab meat. I hope you like it. I call them “Crab Cakes for Everybody”.

Yield: about 12-16 appetizer size crab cakes

Ingredients:

  • 1/4 cup mayonnaise

  • 1/4 cup minced green onions

  • 2 large egg yolks

  • 2 tablespoons fresh lemon juice

  • 4 teaspoons minced fresh dill or fennel fronds (or 1 tsp. dried dill)

  • 4 teaspoons minced fresh tarragon (1 tsp dried)

  • 4 teaspoons minced fresh cilantro (or 1 tsp. Old Bay seasoning)

  • 1 tablespoon Dijon mustard

  • 1 tablespoon finely grated lemon peel

  • dash of Worcestershire Sauce

  • a few drops of Tabasco (optional)

  • 1/4 teaspoon ground black pepper

  • 1 pound blue crab meat or Dungeness crab meat (if you can’t get fresh, use canned crab)

  • 2 cups panko (Japanese breadcrumbs), divided

  • 2 tablespoons (or more) butter

  • 2 tablespoons (or more) grapeseed oil

Preparation:

  1. Line baking sheet with waxed paper.

  2. Whisk first 10 ingredients in large bowl.

  3. Mix in crabmeat and 1 cup panko, breaking up crabmeat slightly. Let stand 10 minutes.

  4. Place remaining panko on rimmed baking sheet, spreading slightly.

  5. Form crab mixture into sixteen 2-inch-diameter patties, using about scant 1/4 cup for each. Press both sides of patties into panko. (*Note: to avoid breaking apart the patties when turning, use a spatula to gently turn over each patty.)

  6. Transfer patties to waxed-paper-lined baking sheet. Cover and chill at least 1 hour and up to 1 day. (This allows the flavors to integrate and makes the patties easier to work with when you fry them.)

  7. Melt 1 tablespoon butter with 1 tablespoon oil in each of 2 heavy large skillets over medium-high heat.

  8. Add crab cakes to skillets and cook until golden on both sides, adding more butter and oil as needed, about 5 minutes total.

Serve with Remoulade Sauce.

print recipe
December 14, 2019 /FoodBlogChef
crab, shellfish, starters
Starters
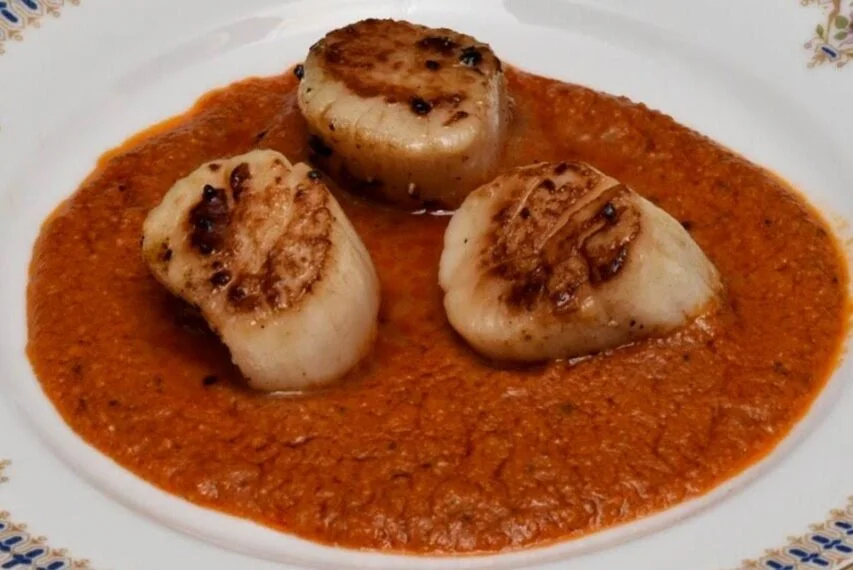
Photo: c. foodblogchef 2019 - Seared Scallops with Romesco Sauce

Photo: c. foodblogchef 2019 - Seared Scallops with Romesco Sauce

Seared Scallops with Romesco Sauce →

November 18, 2019 by FoodBlogChef in Starters

Rich colorful Romesco sauce features almonds, olive oil, peppers, and tomatoes….ingredients widely used in Spanish cuisine. It’s not surprising almonds and olive oil are popular ingredients in many Spanish dishes: Spain is the number one producer of olive oil in Europe and second to the United States in producing almonds. Serve the sauce with fish or shellfish and/or grilled vegetables, or on crostini. It is also an excellent dip for crudités (assorted raw vegetables).

Romesco Sauce

Yield: about 2 cups

Ingredients:

  • 1 medium red pepper, and

  • 1 orange or red Cubanelle pepper roasted, peeled, seeds and membranes removed

  • 3 medium tomatoes or 4 Roma tomatoes (about 3/4 pound)

  • 2 thick slices (about 2 ounces) baguette or country-style bread, crusts removed, lightly toasted

  • 2 large garlic cloves, peeled

  • ½ cup toasted almonds, or a combination of almonds and skinned roasted hazelnuts (I use ¼ c. of each)

  • 1 to 2 teaspoons pure ground smoky ancho chile powder, or regular chili powder to taste (*Note: 1 tsp. is mild; 2 tsp. has a bit of heat)

  • 1 tablespoon chopped fresh Italian parsley

  • 1 teaspoon sweet paprika or Spanish smoked paprika (pimentón) (*Note: use regular paprika if you use smoky ancho chili powder; use the smoked pimentón with regular chili powder.)

  • Salt, preferably kosher salt, to taste

  • Freshly ground pepper to taste

  • 2 tablespoon sherry vinegar

  • ¼ to ½ cup extra virgin olive oil, as needed

    (*Note: Romesco will keep for a few days in a tightly sealed glass container in the fridge.)


Preparation:

Preheat the broiler and cover a baking sheet with foil.

  1. Lightly toast the bread and nuts and set aside.

  2. Cut the tomatoes in half, core and seed them; do the same with the peppers and quarter them.

  3. Place the tomatoes and fresh peppers skin side up on the baking sheet and place under the broiler at the highest setting. Broil for two to four minutes, until skin is charred. Remove from the heat, transfer to a bowl and allow to cool. The skins on the tomatoes should peel off easily; you may have to scrape off the pepper skins after a few minutes. (see *Note about peppers)

  4. Add the garlic cloves to a food processor and process until the garlic is chopped and adheres to the sides of the bowl, stop the machine and scrape down the sides. Add the toasted almonds (or almonds and hazelnuts), bread and chile powder to the bowl and process to a dry paste.

  5. Scrape down the sides of the bowl and add the peppers, tomatoes, parsley, paprika, salt and pepper and process until smooth.

  6. With the machine running on slow, add the vinegar and olive oil in a slow stream, beginning with the smaller amount of olive oil and adding more until you achieve the consistency you want. Increase the speed and process until well mixed and scrape into a bowl.

  7. Taste and adjust seasoning, adding salt or chile as desired.

  8. Allow the sauce to stand for an hour or more at room temperature to meld the flavors before using.

  9. Left-over sauce will keep in the refrigerator in a tightly closed container for several days.

*Note: if you don’t want to bother roasting, peeling, and seeding the peppers, an acceptable substitute is a 12 ounce jar of Roasted Peppers, drained and patted dry. Proceed as above.

Seared Scallops:

Serves 4

  1. Use 12 large sea scallops, preferably flash frozen, to avoid the bitter taste of chemically treated scallops.

  2. Pat the scallops dry and salt and pepper them.

  3. Heat a heavy frying pan like a cast iron skillet until it is very hot. (Your seasoned cast iron pan will begin to smoke.)

  4. Add 1 tablespoon of olive oil, swirl the oil in the pan and add 6 scallops, cooking without moving the scallops for 2 minutes per side. Flip the scallops and cook for an additional 2 minutes. This should ensure a nice seared crust on the scallops without over-cooking them.

  5. Remove the scallops to a platter and tent; repeat the process above with the remaining 6 scallops.

Prepare the plates:

Spoon 3-4 tablespoons of Romesco onto a small plate, top with 3 scallops on each plate.
Garnish with a few strands of green Japanese Salad for added color and texture. (optional)
Serve with a crusty bread to dip in the delicious sauce.

A Spanish Albariño or Verdejo, or a light Italian Vermentino, a soft Sauvignon Blanc, or even a slightly effervescent Portuguese Vinho Verde pair well with this dish. Salud!

Adapted from: https://cooking.nytimes.com/recipes/1016089-martha-rose-shulmans-romesco-sauce

print recipe
November 18, 2019 /FoodBlogChef
romesco, almonds, spanish-food, sauce, scallops, starters, peppers, tomatoes
Starters
photo: c. foodblogchef 2019 - Anise Flavored Shrimp, Frico, and Delicata Squash with Pomegranate, Pistachio Relish

photo: c. foodblogchef 2019 - Anise Flavored Shrimp, Frico, and Delicata Squash with Pomegranate, Pistachio Relish

Anise Flavored Shrimp, Frico, and Delicata Squash with Pomegranate, Pistachio Relish →

November 05, 2019 by FoodBlogChef in Starters

This is an elegant starter for a special meal. It takes a bit of prep work, but the results are worth it. Make the Fricos a day ahead. They will keep for a couple of days in an air-tight container. Try not to eat them all before you make the shrimp and relish.

1. PARMESAN FRICOS (CHEESE CRISPS)

Ingredients:

  • 1- 8 ounce piece Parmigiano-Reggiano

  • 2 1/2 tablespoons all-purpose flour

  • 1/2 teaspoon black pepper

  • 3/4 teaspoon herbes de Provence, optional

  • ½ tbs lemon zest

    *Note: make the Fricos first and store them between sheets of parchment paper. They will keep for a couple of days in an airtight container.

Directions:

Preheat oven to 375°F. Line a half sheet pan with a silpat or parchment paper; a non-stick sheet pan works well also.

  1. Using the largest holes on a box grater, coarsely shred the cheese.

  2. Stir together the cheese, flour, pepper, and herbes de Provence in a large mixing bowl.

  3. Arrange tablespoons of cheese four inches apart on the silpat/parchment paper, stirring the cheese mixture in the bowl between tablespoons to keep the flour evenly distributed.

  4. Flatten each mound slightly with your fingertips to form a three-inch round.

  5. Bake the fricos until golden, about 10-12 minutes.

  6. Cool two minutes on the half sheet pan, then carefully transfer each crisp (they are very delicate) with a thin spatula to a rack to cool completely.

    *Frico recipe adapted from: https://www.splendidtable.org/recipes/lacy-parmesan-frico

2. ROASTED DELICATA (or ACORN) SQUASH WITH POMEGRANATE-PISTACHIO RELISH

RELISH:

Ingredients:

  • 2 Delicata squash, washed well and cut into rings (you don’t have to remove the skin)

  • 2 tablespoons unrefined coconut oil, melted

  • sea salt

  • freshly ground black pepper, to taste

  • 2 tablespoons unrefined, cold-pressed olive oil

  • 2 tablespoons unfiltered apple cider vinegar or pomegranate molasses

  • ½ teaspoon sea salt

  • 1 cup pomegranate seeds (or dried cranberries, or dried cherries)

  • ½ cup pistachio nuts, toasted

  • 2 small shallots, chopped (or 1 medium)

  • 3 Tablespoons fresh mint, chopped

    *Note: this makes about six servings

Directions:

Preheat oven to 400 degrees and line 2 baking sheets with parchment paper.

  1. Place the squash rings on the baking sheets and brush with melted coconut oil on both sides. Sprinkle with salt and pepper. Roast until tender, approximately 20-30 minutes.

  2. While squash is roasting, assemble relish. Whisk the oil, vinegar, and salt together in a medium bowl, add remaining ingredients and toss to combine.

  3. Arrange the squash rings on small plates and spoon relish mixture on top. (Note: alternatively you can chop up the squash and gently stir it into the relish before you spoon it onto a leaf of lettuce)

    *Squash recipe adapted from: https://pamelasalzman.com/roasted-delicata-squash-with-pomegranate-pistachio-relish-recipe/

3. ANISE FLAVORED SHRIMP

  1. Saute 6 extra large shrimp for one minute on each side.

  2. Add 2 tablespoons of anise flavored liquor (Anisette, Pastis, Pernod), stir the shrimp briefly to coat with the liquor and remove from heat.

4. ASSEMBLE THE PLATES:

  1. Gently stand a Frico on edge vertically into the mounded Relish and place an Anise Flavored Shrimp on the Relish leaning against the Frico.

  2. Serve at room temperature.

*Note: a soft Loire Valley Sauvignon Blanc or a Viognier pairs nicely with this dish.

print recipe
November 05, 2019 /FoodBlogChef
shrimp, pomegranate, pistachio, frico, parmesan, starters
Starters
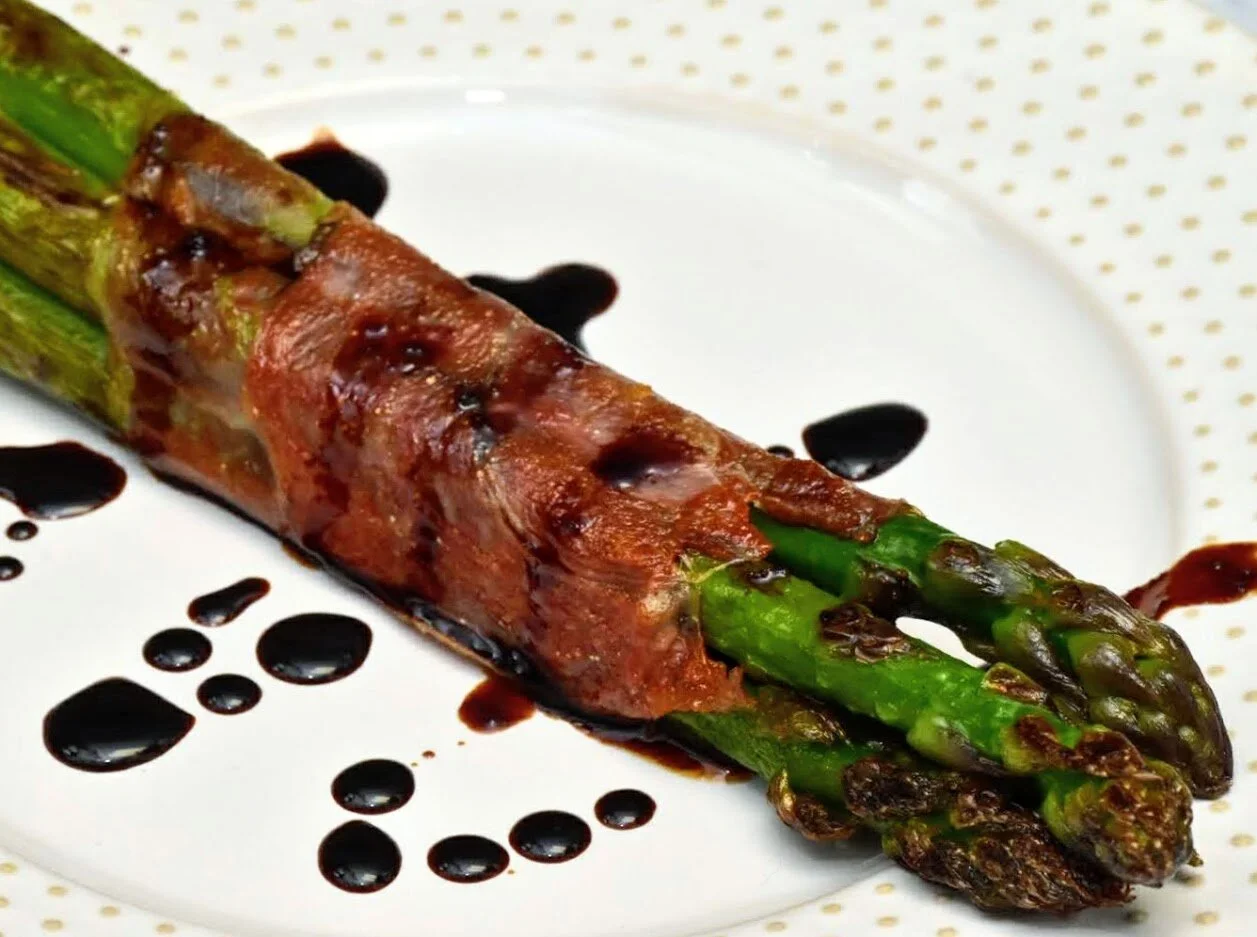
Photo: c. foodblogchef 2019

Photo: c. foodblogchef 2019

Asparagus Prosciutto Bundles with Balsamic Reduction →

November 01, 2019 by FoodBlogChef in Starters

Salty, sweet, sour, bitter, and umami…it’s all in there! One of my favorite first courses.
serves 6

Ingredients:

• 1 pound medium-size asparagus, tough bottom thirds discarded
• 6 slices of Italian prosciutto
• Good olive oil
• half a lemon
• Salt and freshly ground black pepper
• Balsamic reduction

Directions:

1. Fill a large pot with water, add 1 tablespoon salt, and bring to a boil. If the asparagus are thick, peel them halfway up the stalk with a vegetable peeler.

2. Immerse the asparagus in the boiling water and cook for 2 minutes, until they are crisp-tender.
3. Drain the asparagus and put them immediately into a large bowl of cold water to set the bright green color. Allow to chill for 2 to 3 minutes. Drain and pat the asparagus dry.

4. Gather asparagus spears into 6 bundles with the tips together, and wrap a slice of prosciutto securely around the middle of each bundle.

5. Over medium-high heat, heat a griddle or cast iron pan with a tablespoon of olive oil.

6. Place the bundles with the prosciutto seam side down and sear until the prosciutto is turning brown and beginning to turn crispy. (Note: if you can't fit all 6 bundles on your griddle at the same time, cook them in batches of 3.)

7. Turn the bundles over and give each bundle a small squeeze of lemon juice and continue cooking until the second side is slightly brown and turning crispy.

8. Plate the bundles either individually or on a platter and drizzle a little balsamic reduction over each bundle. (see *Note below)

9. Salt and pepper to taste.

*Note: Balsamic Reduction

Ingredients:

1/2 cup balsamic vinegar
1 tablespoon brown sugar

Directions:

  • Mix balsamic vinegar with brown sugar in a saucepan over medium heat, stirring constantly until sugar has dissolved.

  • Bring to a boil, reduce heat to low, and simmer until glaze is reduced by half. At proper reduction, the glaze should coat the back of a spoon.

  • Let cool and pour into a jar with a lid; store in the refrigerator.

Print Recipe
November 01, 2019 /FoodBlogChef
asparagus, prosciutto, balsamic-reduction, starters
Starters

Instagram Facebook Pinterest

Powered by Squarespace